Paint Audio MIDI Captain foot controller

Hello, it will be a responsibility.
Midi captain geak mode systems with Fractal Fm3. I switch scenes with A B C D buttons. I also assigned (CC) effects to 1 2 3 4 buttons. Delay drive chorus etc. I turn on the delay and the button light is on. When I press the button again, the delay turns off but the light is still on. How can I turn off the light when the effect turns off?
I sent an e-mail to Wilson but he did not respond. I have a concert soon. What should I do?
You can enter edit files - and make all the changes you want.
Here is ytb channel with editing lessons:

Wr Wilson is not responsive to product owners(((
 
Yes, I watched all those videos. Unfortunately, I did not get an answer to my question.
If your question is:
How can I make the light turn off when fx is off?
Then the answer is: no way.
Midi Captain will never know - is your fx in or off, it has no incoming midi transcript or.
The way to achieve your goal -is to make on/off switch button with on/off LEDs. And your FX should be controlled by that button. And it is a pretty simple task described in tutorials.
So what is you ur problem?
 
"How can I make the light turn off when fx is off?"
That was my question..
I turn on Fx. The light comes on. I turn off Fx again but the light does not turn off.
 
"How can I make the light turn off when fx is off?"
That was my question..
I turn on Fx. The light comes on. I turn off Fx again but the light does not turn off.
It's been a while since I've dusted mine off and used it, but isn't that the way Geek Mode is? IIRC, the last pressed switch will be illuminated. The only dim switches are the ones you haven't pressed?
 
When I open it in normal mode, I have to connect it to the computer via USB when I want to make changes. This is not very practical.
 
Is it feasible to DIY upgrade to a larger screen?

The Paint Audio Micro 6 and Nano 4 look very promising ... especially with the Kemper PySwitch firmware. That screen is just too small for my poor eyes. No way I can read it on the floor.

Wondering if the Micro or Nano can house a larger display:
  • Is there enough physical space in either to mount a larger display (with a larger cutout our a new enclosure
  • Is it a simple swap out for a larger display for the control and power supply electronics? A larger display might need external power...
  • Would it need a firmware update to support this. (Looks like PySwitch firmware can support different display sizes)

Has anyone torn down these devices? That would give a quick read on if there is space and if the display/driver is easily replaceable.
 
Last edited:
Is it feasible to DIY upgrade to a larger screen?

The Paint Audio Micro 6 and Nano 4 look very promising ... especially with the Kemper PySwitch firmware. That screen is just too small for my poor eyes. No way I can read it on the floor.

Wondering if the Micro or Nano can house a larger display:
  • Is there enough physical space in either to mount a larger display (with a larger cutout our a new enclosure
  • Is it a simple swap out for a larger display for the control and power supply electronics? A larger display might need external power...
  • Would it need a firmware update to support this. (Looks like PySwitch firmware can support different display sizes)

Has anyone torn down these devices? That would give a quick read on if there is space and if the display/driver is easily replaceable.
Just use any old tablet with TouchOSC installed and programmed of you really need a screen.
 
Does TouchOSC handle all the. Bi-directional info for block states and preset names?
TouchOSC can do anything. You can code there with lua C library.
In my case all the track names, colors, knob names, states, levels go from Ableton to tablet via RTPmidi over wifi. And I can control everything on a tablet an see all knob names even they change on midi PC messages sent to Ha-lion vst.

The only trouble i am facing with touchOSC is multidevice conection on windows. The prblem might be in windows midi drivers or in RTPmidi app.
 
Last edited:
Hello, Friends! I am struggling alot with no visual feedback from DAW on MidiCaptain....
And i have written to Mr. Wilson several times.... Can we all try to get his attention to this topic?
It would be nice if you all concact him and ask him for attention to this topic. I hope that it would make him to stert working on firmware improvement. I suppose that you can just send him a email with my message body. The message is big enouth so i have divided it into two posts here.

Here are the adresses:
wilson-zuo@paintaudio.com
support@paintaudio.com
contact@paintaudio.com


And here is my message body:

Hello, dear Mr. Wilson!
My name is Hellem and I am a big fan of midi controllers.
I use Ableton DAW and many different midi devices and controllers like Akai, M-vave, Imaginando products and custom written touchOSC templates. I use them with Bome midi and remotify.io app for Ableton scripts. In Bome i can program midi behavior and in scripts i can program the logic and get a response on my controllers.

So not all of the controllers have visual feedback from daw, and it is disappointing. TouchOSC and new M-vave products can do so. But midiCaptain has no firmware to control its LEDs to get the visual feedback from DAW.

So my aim is to ask you, to beg you, and to help you to build a simple firmware for MidiCaptain with LED response from DAW. I have sent you a few videos a year ago, and I would like to ask you once again to start communication between you and me to get this task done.

The concept of this firmware is pretty simple. The minimum list of features is next:

Messages sent from MidiCaptain:
- single page
- 10 buttons - to be momentary CH1 CC 0-9 with 127 press and 0 release values
- 2 expression pedals on CH1 CC like 10 and 11 with continuous 0-127
- wheel press - CH1 CC 12 127, wheel release CH1 CC 12 0
- wheel turned clockwise CH 1 CC 13 1
- wheel turned counter-clockwise CH 1 CC 13 127
like it is an endless knob

Messages sent to MidiCaptain:
The idea of sending messages to MidiCaptain is to control its LEDs and there are different approaches to achieve it, here are some examples - any of them can be implemented.

- Sysex messages. For buttons - each of buttons have 3 LEDs. Each led is RGB and each R, G,B has a brightness. So to control 1 button 1st LED the Sysex message can be next -
42 (for letter B - button) 01 (for button 1) 01 (for LED 1) XX (for RED) YY (for GREEN) ZZ (for Blue). So XX,YY,ZZ will be for LEDs brightness in the 0-127 range. I used an ASCII to HEX and DEC to HEX converter here. In this case ALL LEDs can be controlled precisely. And for button 1 LED 1 white color the message would be 42 01 01 7F 7F 7F

- NoteON messages on CH1.
For button 1 LED 1 the message can be next -
CH1 NOTE 1 VELOCITY = 0-127 Brightness for R
CH1 NOTE 2 VELOCITY = 0-127 Brightness for G
CH1 NOTE 3 VELOCITY = 0-127 Brightness for B

For button 1 LED 2 the message can be next -
CH1 NOTE 4 VELOCITY = 0-127 Brightness for R
CH1 NOTE 5 VELOCITY = 0-127 Brightness for G
CH1 NOTE 6 VELOCITY = 0-127 Brightness for B

For button 1 LED 3 the message can be next -
CH1 NOTE 7 VELOCITY = 0-127 Brightness for R
CH1 NOTE 8 VELOCITY = 0-127 Brightness for G
CH1 NOTE 9 VELOCITY = 0-127 Brightness for B

For button 2 LED 1 the message can be next -
CH1 NOTE 11 VELOCITY = 0-127 Brightness for R
CH1 NOTE 12 VELOCITY = 0-127 Brightness for G
CH1 NOTE 13 VELOCITY = 0-127 Brightness for B

For button 2 LED 2 the message can be next -
CH1 NOTE 14 VELOCITY = 0-127 Brightness for R
CH1 NOTE 15 VELOCITY = 0-127 Brightness for G
CH1 NOTE 16 VELOCITY = 0-127 Brightness for B

...
...

For button 10 LED 1 the message can be next -
CH1 NOTE 101 VELOCITY = 0-127 Brightness for R
CH1 NOTE 102 VELOCITY = 0-127 Brightness for G
CH1 NOTE 103 VELOCITY = 0-127 Brightness for B

So all Buttons LEDs can be controlled with this message system.
And something similar can be created using CC messages to control LEDs.

And this type of firmware will give endless opportunities for Ableton users to write their own script in remotify.io and get visual feedback from DAW. All logic, pages and structure can be done in remotify script for Ableton or in Bome midi. The main thing that is missing is visual feedback from DAW to the controller. And MidiCaptain should respond fast - so there is no need to keep the info about pages in the MidiCaptain firmware.

And I am begging you to implement such functionality. ASAP or not ASAP, lets just start it PLEASE....

Also the MidiCaptains screen can be used for feedback - but it is a different story and it is more complicated - but I can provide you with many essential scenarios of how it can be used with DAW feedback.

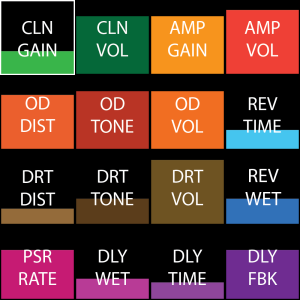
The unified layout for the screen would be next (i have attached 240x240 picture):
- the firmware can keep the value of the number of the objects and their types available for creation and for control. Let object types be "box" and "text", and the value will be 16 for box and 16 for text. It means that 16 boxes can be created in this firmware and 16 text objects can be created in this firmware. The data for that objects can be set in config file or be sent to MidiCaptain by Sysex midi. I would breper config data to be set all to 0. Because I am to build a flexible dynamic setup and all the data I need will always be sent via midi.

Many data types like width, color (that can be greater than 127) need to be sent in 2 cells - because of 0-127 cell limitation in Sysex midi messages. Let the backround will be black (or defined by 17th box)
So to control BOX the variables can be next:
box_object_number 0-16
box_width 0-240
box_height 0-240
box_x_position 0-240
box_y_position 0-240
box_z_index 0-sum_of_elements (in this case 32)
box_color_r 0-255
box_color_g 0-255
box_color_b 0-255
box_fill_direction 0-1 (for horizontal or vertical)
box_fill_ammount 0-127 (the value that corresponds for box fill - like the value of a knob in DAW - to represent of ammount of effect)
box_visibility 0-127 (or alpha - not necessary but it may be usefull)

box_border_size 0-127 (let the border type to be always inner)
box_border_color_r 0-255
box_border_color_g 0-255
box_border_color_b 0-255
box_border_visibility 0-127 (or alpha - not necessary but it may be usefull)
 

Attachments

  • DIsplay layout-01.png
    DIsplay layout-01.png
    59.5 KB · Views: 2
There can be 2 ways of controlling the BOX: with short messages or with long messages.
For short control the message can be next:
B(for BOX) 0(for 1st box) S(for SHORT) and here we can select desired variable to transfer, let it be box_y_position, so Y(for Y position) X(for desired value)
so the message would be -
B 0 S Y 150 and lets translate it into HEX -
42 00 53 59 7F 17
Here the value should be transferred in 2 cells - because it is higher than 127, so we transfer 127 and 23. 7F (for 127) and 17 (for 23).
So this way we can control the box with short messages by sending messages with defined structure and variables. We need to decide what LETTER for what variable should be used. Like Y - for box_y_position, and in HEX it would be 59. As there would be less than 127 variables - the task can be achieved. Also the firmware needs to be programmed to receive that messages - transcribe them and control the box with them. I have done such in TouchOSC. I send out parameters from Ableton (like values, states, colors, Names) via Remotify.io scripts that i can write by myself using python. And in TouchOSC I transcribe them via the Lua library built in to TouchOSC to desired destinations.
Short messages are useful to quickly change ther state of the box.

To control the box with long messages the message structure should be defined. The order can be defined in any way - but it should be defined strictly and equally on both (firmware and ableton script) sides. And the variables should all be sent in a single message. Long messages can be defined for whole BOX parameters. Or that parameters can be divided into groups (like position, look, border). Here is an example of transferring all BOX parameters for the box from my example (image attached) with the name on it CLN GAIN (text is not transferred here):
B(for BOX) 0 (for 1st box) L(for LONG - or here can be another letter used, if we decide to group parameters like P for positional parameters or O for lOok parameters or B for border parameters) and here we need to list all parameters and lets list them in order of appearance that i have created earlier... 60 (for box_width) 60 (for box_height) 0 (for box_x_position) 0 (for box_y_position) 0 (for box_z_index) 57 (for box_color_r) 181 (for box_color_g) 74 (for box_color_b) 0 (for box_fill_direction horizontal) 38.1 ( for box_fill_ammount) 127 (for box_visibility) 1 ( for box_border_size) 255 (for box_border_color_r) 255 (for box_border_color_g) 255 (for box_border_color_b) 127 (for box_border_visibility)

So the message would be next:
B 0 L 60 60 0 0 0 57 181 74 0 38.1 127 1 255 255 255 127
The value 38.1 is calculated by the 18px/60px from my picture and I suppose that it should be rounded somehow, let it be 38. Also all parameters that can be higher than 127 should be sent in 2 cells, so we need to point that in the final message. Lets create final message using HEX converter:
42 00 4C 3C 00 3C 00 00 00 00 00 00 39 00 7F 36 4A 00 00 26 7F 7F 7F 7F 7F 7F 7F 7F

So the message is long - but it contains all information about the BOX.
Feel free to use this algorithm - or to ask any questions or suggest improvements. To translate these messages in TouchOSC I used the Lua library. It is C language based. I created a function on receiving Sysex midi messages, and the If message[1]= 42 do ..... and so on. So there were lots of If and do/sent/notify strokes.

And for Text objects the variables should be next:
text_object_number 0-16
text_x_position 0-240
text_y_position 0-240
text_z_index 0-32 (objects amount)
text_horizontal_align 0-2 (lest, center, right)
text_font_size 0- ... i don't know))))
text_color_r 0-255
text_color_g 0-255
text_color_b 0-255
text_text "some text" may be the length should be limited by firmware, in my setup I don't use the names that are longer than 9 characters. Like RVRB PANL is the longest.
And to transfer text the ASCII to HEX converter can be used. like this one -https://www.rapidtables.com/convert/number/ascii-to-hex.html
So to control TEXT objects there can be short and long messages like for BOX. Here i will show an example of LONG message that contain all the parameters in the listed above order to control text field i have shown in attached image (i am talking about upper left called CLN GAIN):
T (for text object) 0 (for 1st object number) 30 (for text_x_position) 30 (for text_y_position) 32 (for text_z_index) 1 (for text_horizontal_align center) 15 (for text_font_size) 255 (for text_color_r) 255 (for text_color_g) 255 (for text_color_b) CLN GAIN (for text_text)
And i will translate text to hex here - 43 4C 4E 20 47 41 49 4E

So all the parameters that can be higher than 127 should be sent in 2 cells. Lest create final massage:
54 00 1E 00 1E 00 20 01 0F 7F 7F 7F 7F 7F 7F 43 4C 4E 20 47 41 49 4E
So this message will control all TEXT object variables.

Also Color can be transferred a bit easier and faster. Sending RGB separately is a good idea, but there is no actual need to send all 255 values in 2 cells. Color can be divided by two on sending. And it will take only 1 cell - it would be much faster. And then color value should be *2 to match color schemes. The color would be a bit inaccurate - but it doesn't really matter. For example, to transfer a pure RED color that is 255 0 0 we don't need to send 7f 7f 00 00 00 00. We can just send 7f 00 00 - which means 127 0 0. and on the receiving side we need to use it like 127*2 0*2 0*2 that would be 254 0 0 - and it is pretty close to the original color.

So adding this kind of object to the screen would be super useful - so users can create their own screen layouts with visual feedback from daw. Also there can be added a feature to control box_fill_ammount with simple midi like CC. And same for box_visibility.
Like in a firmware config file can be a line containing a simple midi message that will correspond for controlling box_fill_ammount. Like:
1_box_fill_ammount = ch1 cc1 val
It would make BOX controlling a bit easier.

So the pipeline for this firmware in order of demand is next:
- led feedback (i suppose it would be much easier to implement and it has high demand)
- screen feedback (i don't even know - is that possible due to unit processor speed and memory - but it hope it can be done - and i suppose that it is an important feature but not essential)
 
I caught a video about these controlling a Kemper Player. I ordered one bundled with an expression pedal. I couldn't be happier! I am aware they have a version of their "OS" specifically for a KPP, but I stuck with stock and it is perfect for my uses. I showed my sound/lighting person and he ordered one and now controls our lights with it. From our experience, these are perfect for our uses.
 
Hi All.

I have a Paint Audio Mini 6 using Super Mode firmware. Currently key2 and key5 are defaulted for paging up and down the patches with a long press. The problem is, I'm using key5 to long press to play notes from a synthesizer, but when I do, the patch I am on changes. My question is how can I use super mode to change the default up and down for patches to allow long presses for other functions? I understand you can use an external controller to change patches up and down on the Mini6 using cc#s. I'm hoping to open up these switches for other long press purposes. (Just easier to access the lower row in a live setting.)

Thanks!
 
Back
Top