Fender FR-10/FR-12 noise reduction mod

So, having spent hours today with de-solder braid, continuity testing, reflowing solder joints on every single component etc, I finally nailed down the problem. The PCB is fine, no tracks broken and no solder pads detached from pads, and no dry joints. It was a faulty Volume Pot, one of the three solder lugs was ever so slightly loose on the brown fibre board, as if the rivet wasn't fully tight and the lug could move a miniscule amount and so was not making full contact with the potentiometer track, but it was intermittent, so when I moved the volume or slightly flexed the board it would disconnect/reconnect. I make guitar pedals for fun so luckily I had a replacement pot to hand. I soldered it in and now the amp is fully working, along with the satisfying outcome of the original work (following the replacement of the three TL084s with OPA 4227PAs) it isnow silent!

So, my observations/lessons learnt is;

Firstly; there should be a small but significant addition to the disassembly instructions and, in my opinion, it is a must: ๐——๐—ข ๐—ก๐—ข๐—ง ๐˜๐—ถ๐—น๐˜ ๐˜๐—ต๐—ฒ ๐—ฃ๐—ฟ๐—ฒ-๐—ฎ๐—บ๐—ฝ ๐—ฏ๐—ผ๐—ฎ๐—ฟ๐—ฑ ๐˜๐—ผ ๐—ฟ๐—ฒ๐—บ๐—ผ๐˜ƒ๐—ฒ ๐—ถ๐˜, the slightest bend on the Pots will put a strain on them and could cause damage to them or the PCB, however, the good thing is that this is so simple to avoid and only adds 30 seconds to the work: undo the four screws holding the XLR board and connectors on and move it out of the way (don't even need to undo the earth cable that goes to pillar) this allows the Preamp board to slide in and out without any bend to the pots whatsoever.

Second lesson is; ๐—ฑ๐—ผ๐—ป๐˜ ๐—น๐—ฒ๐˜ ๐˜๐—ต๐—ถ๐˜€ ๐—ฝ๐˜‚๐˜ ๐˜†๐—ผ๐˜‚ ๐—ผ๐—ณ๐—ณ! If you have soldering experience then it really is a simple thing to do and reaps great results. It took me 30 minutes to remove the three TL084s and solder some turned pin sockets. I use turned pin as this prevents the chips coming loose when its in transit, which after all; its a guitar amp so its going to get moved, usually!

Finally: ๐—ง๐—ต๐—ถ๐˜€ ๐—ถ๐˜€ ๐—ฎ๐—ฏ๐˜€๐—ผ๐—น๐˜‚๐˜๐—ฒ๐—น๐˜† ๐˜„๐—ผ๐—ฟ๐˜๐—ต ๐—ฑ๐—ผ๐—ถ๐—ป๐—ด, the reducing is Hiss is phenomenal, its gone from annoying to me having to check if I have the amp switched on!
Did you happen to get video of the process?
 
Firstly; there should be a small but significant addition to the disassembly instructions and, in my opinion, it is a must: ๐——๐—ข ๐—ก๐—ข๐—ง ๐˜๐—ถ๐—น๐˜ ๐˜๐—ต๐—ฒ ๐—ฃ๐—ฟ๐—ฒ-๐—ฎ๐—บ๐—ฝ ๐—ฏ๐—ผ๐—ฎ๐—ฟ๐—ฑ ๐˜๐—ผ ๐—ฟ๐—ฒ๐—บ๐—ผ๐˜ƒ๐—ฒ ๐—ถ๐˜, the slightest bend on the Pots will put a strain on them and could cause damage to them or the PCB, however, the good thing is that this is so simple to avoid and only adds 30 seconds to the work: undo the four screws holding the XLR board and connectors on and move it out of the way (don't even need to undo the earth cable that goes to pillar) this allows the Preamp board to slide in and out without any bend to the pots whatsoever.
I've updated my instructions on page 3.

-Aaron
 
Itโ€™s relatively easy to do, however, I strongly advise a change in the dismantling process; remove the small board that holds the XLR sockets BEFORE removing the preamp board. Doing this extra (very easy) step avoids the need to bend the pots as the preamp board can now just slide out. I think what happened to mine is that when bending the volume pot to remove the board it has separated the solder pad from the pcb track. Iโ€™m Investigating more this morning.
I too removed the XLR sockets prior to removing The board.
 
There really is no need, you just remove the three TL084s and replace them with the OPA 4227s. To be honest if you dont feel you can do that without a video I suggest you get someone else to do it as, to someone with experience, itโ€™s very simple.
You're not going to let this go are you :grin
 

Attachments

  • IMG_9817.jpeg
    IMG_9817.jpeg
    1.5 MB · Views: 84
  • IMG_9818.jpeg
    IMG_9818.jpeg
    1.3 MB · Views: 85
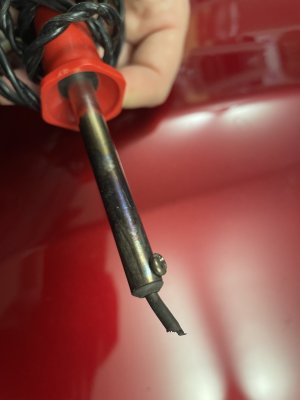
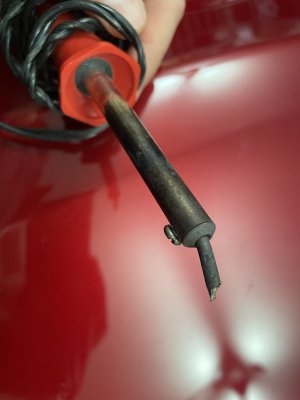
I hope those pics are a joke, but please do not try to use that soldering iron for this work. Just take it to an electronics shop. Itโ€™s an easy task for someone with experience, but itโ€™s also something you can easily mangle if youโ€™ve never soldered small ICs before. Doubly so if thatโ€™s the soldering iron youโ€™re planning to use. Yikes.

Learning to solder is a great skill, but you shouldnโ€™t learn on things that have any value to you.
 
@lolainnb get you a proper setup and fine point solder tips. Thin solder and a good solder sucker . I'm a novice and jumped into soldering by putting together a drive pedal with a three band EQ like just this year. I fucked that PCB up with the wrong tools and still got it to work.


If I can do that, you can do this!
 
@lolainnb Not sure of the point of your post since you added no explanation for posting the pics but if thatโ€™s what you think you need then stay well away from doing this mod and get someone with experience to do it.
 
@lolainnb get you a proper setup and fine point solder tips. Thin solder and a good solder sucker . I'm a novice and jumped into soldering by putting together a drive pedal with a three band EQ like just this year. I fucked that PCB up with the wrong tools and still got it to work.


If I can do that, you can do this!
Iโ€™ve never really learned to solder (despite having an EE background and a long history of modding all my gearโ€ฆ or trying lol.) Iโ€™ve asked for one of those StewMac Tube Screamer kits for my birthday, and Iโ€™m going to refresh my tool kit and finally learn how to do these things properly in 2024. Should be fun breaking out the multimeter and learning how to read schematics again. (Havenโ€™t done any analog analysis in over 30 years. :O)

I have a pile of old dead monitors to harvest for PCBs to practice desoldering/ re-soldering for a while. Maybe by the time Iโ€™m ready to mod an FR12, theyโ€™ll start turning up used or otherwise discounted. :)
 
I just recommend you spend the money on a half-decent soldering station. It makes a big difference with any soldering tasks, whether it's soldering wires to the back of the pots on your guitar, or building pedals or modding a FR-10/12.

I went a long time with those cheap solder pen type deals and by the time I was building my first pedals, I knew I had to get something nicer.
I have a very cheap pen-style now and was planning on upgrading to a slightly less cheap pen with integrated temp reading and interchangeable tips. Iโ€™ll look at the desktop station options instead. Iโ€™m open to any specific suggestions for anything that might be needed: solder, braid, solder sucker, hemostatโ€ฆ what am I forgetting? Starting almost from scratch here.
 
I have a very cheap pen-style now and was planning on upgrading to a slightly less cheap pen with integrated temp reading and interchangeable tips. Iโ€™ll look at the desktop station options instead. Iโ€™m open to any specific suggestions for anything that might be needed: solder, braid, solder sucker, hemostatโ€ฆ what am I forgetting? Starting almost from scratch here.
Get some of those 6x and 10x magnification lenses. They are really helpful for debugging e.g bad solder joints on a pedal PCB.
 
I just recommend you spend the money on a half-decent soldering station. It makes a big difference with any soldering tasks, whether it's soldering wires to the back of the pots on your guitar, or building pedals or modding a FR-10/12.

I went a long time with those cheap solder pen type deals and by the time I was building my first pedals, I knew I had to get something nicer.

My dad was an electrical engineer and back in 1950 when I was born he started doing "hi-fi" and television repairs on the weekends for supplemental income. He had a soldering gun that looked like this.

e35e97d9-00be-4cf1-9308-35e3595ebd2d
 
My dad was an electrical engineer and back in 1950 when I was born he started doing "hi-fi" and television repairs on the weekends for supplemental income. He had a soldering gun that looked like this.

e35e97d9-00be-4cf1-9308-35e3595ebd2d
I have its big brother on the bench here: Weller D-550 240/325 Watts. Makes very quick work of soldering grounds to chassis or the back of a pot ('low-power' and work fast). It's almost as old as I am.
 
Back
Top